
[ad_1]
Homebrewed spells are a great way to bring flavor and uniqueness to spellcasters in your Dungeons and Dragons campaign. Despite the numerous spells available, sometimes you just want to have a fireball do lightning damage or craft something wholly unique and disturbing to fit your gothic horror setting. D&D Beyond’s homebrew spell creation tool makes creating homebrewed spells easy, and with this guide, you can get started right away.
Guidelines for spell creation
Finding the proper balance for homebrewed spells can be challenging. Guidelines to help with the creation of homebrewed spells can be found in the Dungeon Master’s Workshop section of the Dungeon Master’s Guide.
1. Access the homebrew spell creation tool
There are three ways to access the homebrew spell creator on D&D Beyond.
Through the main menu
On desktop, hover over “Collections” and select “Create Spell.” On mobile, tap the “Collections” menu and select “Browse & Create Homebrew.” From there, tap “Create Homebrew Spell.”

From My Homebrew Creations
Alternatively, on desktop, go to “My Homebrew Creations” (accessible from “Collections”) and mouseover “Create a…” from the dropdown. Select “Spell.”

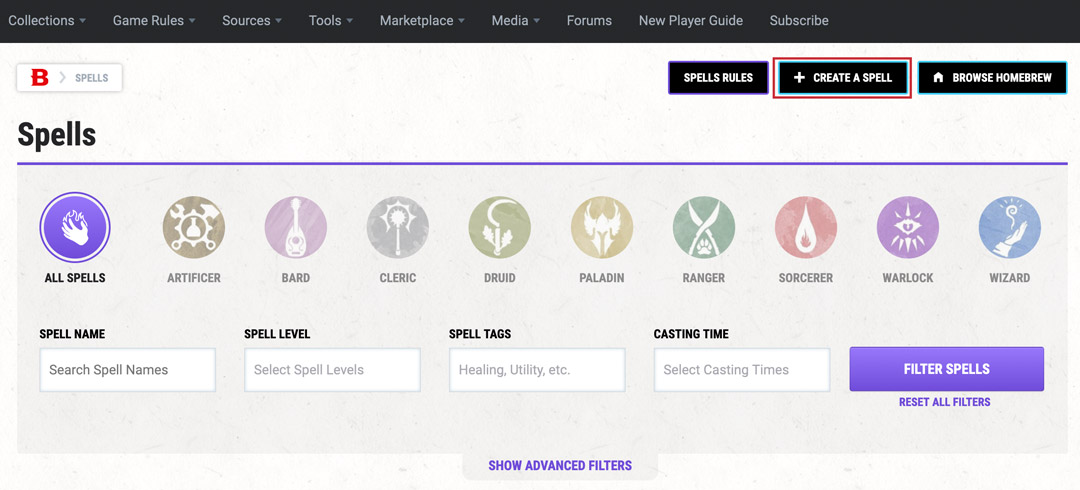
From the Spells page
On desktop, hover over “Game Rules” in the main menu and select “Spells.” From there, you can select “Create a Spell.”
 2. Select your spell creation method
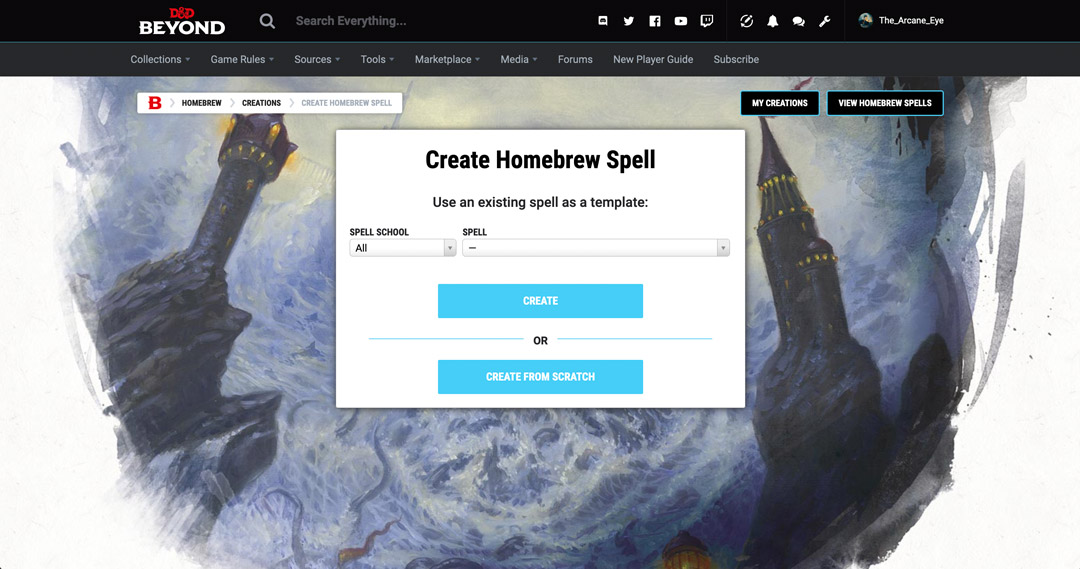
Following any of the above steps will bring you to the Create Homebrew Spell page, where you’ll have two options:
- Use an existing spell: To use an existing spell as a template, choose the spell’s school and search the applicable spells to find the one you are looking for. This will populate the homebrew spell creator’s fields with the existing spells information, which is helpful to make sure you don’t miss any critical fields.
- Create from scratch: If you instead select “Create From Scratch,” you’ll be led to a blank homebrew spell creator for your spell’s construction. This will give you free rein over your spell’s mechanics but is best saved for when you’ve got homebrew experience under your belt.
Using an existing spell
Using an existing spell as a template pre-fills all of the necessary details in the homebrew spell creator based on the spell you chose. From here, you can modify any of these fields to alter the spell’s effect. After making your changes, you can click on the “Save Changes” button to save the version of the spell you’ve created.
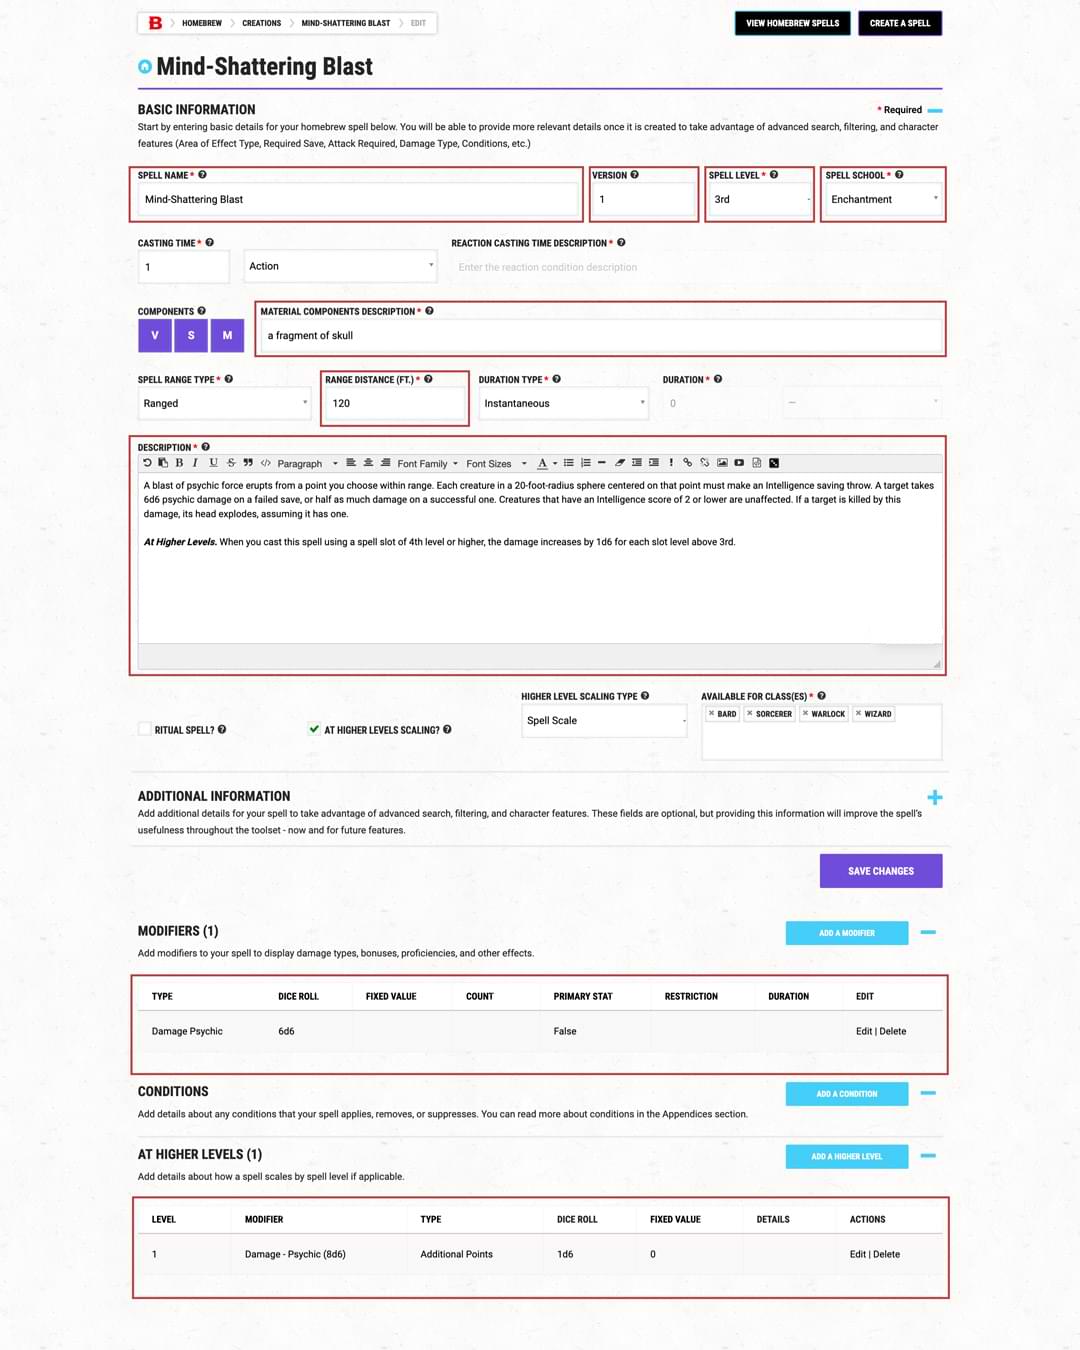
As an example, we will create a spell called mind-shattering blast from the template of fireball.
For mind-shattering blast, we are going to keep the 3rd-level spell slot. Our main changes will stem from the fact that we want our spell to do psychic damage.
When we change the damage type, we must consider how the rest of the spell’s fields will adjust to fit the new effects thematically. Therefore, we are going to change the following fields to make the spell better represent the damage change:
- Spell School: We changed the spell’s school from evocation to enchantment to better represent the spell’s effects. Blasts of psychic damage can be seen in other enchantment spells like Raulothim’s psychic Lance and psychic scream, so it makes sense for our new spell to fall under the school of enchantment.
- Material Components: A tiny ball of bat guano and sulfur doesn’t make sense to be the components of a psychic damage spell. Instead, we’ll change this to a fragment of skull.
- Range: The spell’s range has been decreased from 150 feet to 120 feet to adjust the power level, which is described in more detail below.
- Description: The spell’s effect has changed, so the description should follow suit. Here we describe the spell as a blast of psychic force that has the chance to literally shatter a creature’s mind. We have also noted that the spell will do less damage than fireball. This is because fewer creatures have resistance to psychic damage so if the spell was kept at the original 8d6, it would actually be more potent than the most prominent damage-dealing spell in the game. Another reason for the damage decrease is the spell targets Intelligence saves, which creatures don’t often have proficiency saving against. These changes can be also be seen reflected in the synaptic static. Synaptic Static spell is a 5th-level, psychic damage-dealing spell, that targets Intelligence and deals 8d6 damage. It also has an added debuff on top of the damaging effect, which is par for the course with higher-level spells. Finally, we have noted that the spell cannot affect creatures with an Intelligence score of 2 or less, which is common among psychic damage-dealing spells.
- Available for Classes: Here, we changed the classes that will have access to the spell. It helps to look at similar spells, like Raulothim’s psychic lance, to see which classes should learn the spell.
- Save Type: Because the spell’s damage type is now psychic, it makes more sense for the saving throw to be Intelligence rather than Dexterity. We have also adjusted the damage dice to be 6d6 instead of 8d6.
- Modifiers: This section needs to be adjusted to reflect the new damage type. This change automatically updates the damage type in the “At Higher Levels” section.
That’s it! All we have to do is hit “Save Changes,” and our new spell is ready to go.
Creating a new spell from scratch
This option is great for advanced users who want a blank canvas to create their spell. To help walk you through creating a spell from scratch, we’ll create a 3rd-level spell called flame rush. Here is how we fill out the required fields:
Spell name and version
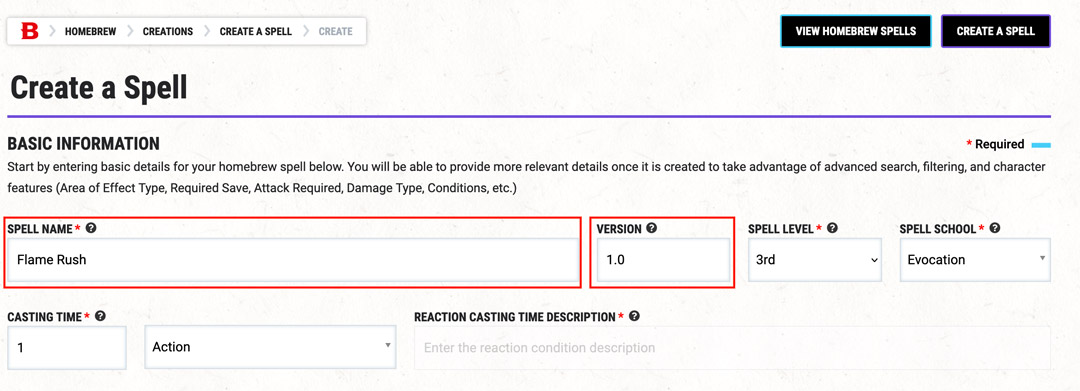
Come up with a fun spell name that accurately reflects the spell’s effects. In this case, we’re going with flame rush.
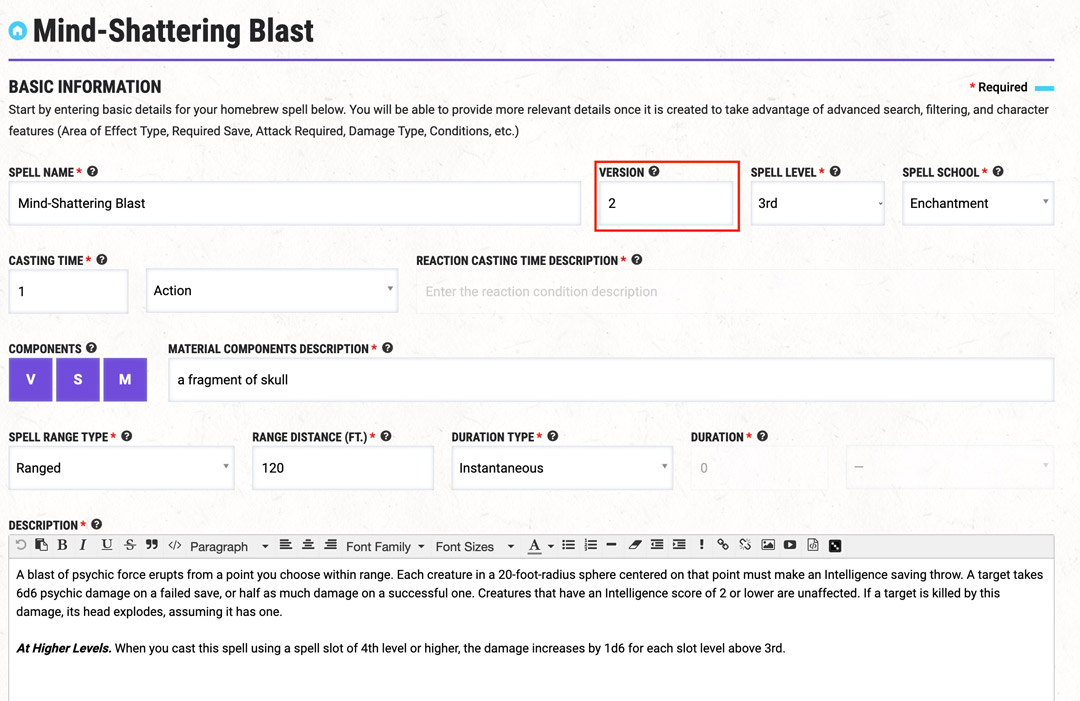
It’s always a good idea to come up with a version number for reference in the version field, especially if you have to make changes or improvements after publishing. This can help you track your changes and keep things organized.
Spell level
Enter the level of your spell, from cantrip to 9th level. We’re going with 3rd level for flame rush because it is comparable to another 3rd-level spell, thunder step.

Spell school
Choose the spell’s school from the dropdown. You can choose from abjuration, conjuration, divination, enchantment, evocation, illusion, necromancy, and transmutation. We chose evocation for flame rush because we are manipulating the forces of fire to propel ourselves forward and damage a target.

Casting time
This section allows you to set the required casting time for the spell. Enter a number into the first field, then select which action or time duration is associated with the number. If you select “Reaction” the “Reaction Casting Time Description” field will become active. For flame rush, we’re going to go with a casting time of one action.

Components
You can choose to have Verbal (V), Somatic (S), and Material (M) components be required for your spell. If you select M, the “Material Components Description” field will become active. For flame rush, we have decided to use Verbal, Somatic, and Material components. The material component is a piece of melted rubber in an attempt to make it relevant to the spell.

Range type
Choose the point of origin (or impact) for your spell in relation to the caster—self, touch, ranged, sight, or unlimited. If you choose “Ranged,” enter the range of the spell in the “Range Distance (FT.)” field. Flame rush has a range of 30 feet.

Duration type
“Duration” dictates how long the spell’s effects will last. Under “Duration Type” you can choose concentration, instantaneous, special, time, until dispelled, and until dispelled or triggered. If concentration, instantaneous, or special are chosen, you are required to specify the duration using the subsequent number field and dropdown. The duration type for flame rush is instantaneous because the spell’s effects happen immediately and conclude after the movement has ended.

Description
Here is where you describe your spell in all its glory. It’s important to remember that you should fully explain what your spell is, how it works, and what targeted creatures need to do. All the various effects and damage should be clearly explained so that anyone reading it understands what the spell does.

You can use tooltips to help with this. While tooltips could make up an article on their own, here are some useful ones. To use them, simply remove the extra space between the square bracket and the keyword:
Ritual spell
Choose whether or not your spell will be a ritual spell. Ritual spells typically have out-of-combat effects, so flame rush certainly wouldn’t fall under this category.

At Higher Levels Scaling
If your spell increases its damage or effects when you cast it with higher levels, check the box and set the dropdown to your preferred choice. The options are:
- Character Level: The spell has different effects at higher character levels (not class levels), like cantrips.
- Spell Level: This indicates a pattern at set level internals, like the number of damage dice when fireball is upcast.
- Spell Scale: Add different effects at higher-level spell slots, like being able to summon higher CR creatures with conjure woodland beings.
Because the damage and range of our spell increases at a consistent level when upcast, we’re going to choose “Spell Scale.”

Available classes
Choose which classes and subclasses get access to the spell. This is usually based on the spell’s effects and the typical spells included in the class’ spell list.

Save point!
Now that you’ve filled out all of the basic information for your homebrew creation, hit “Create Spell.” This will save your progress and give you access to the fields and options where you can add various modifiers, conditions, and effects at higher levels.

Add in additional information
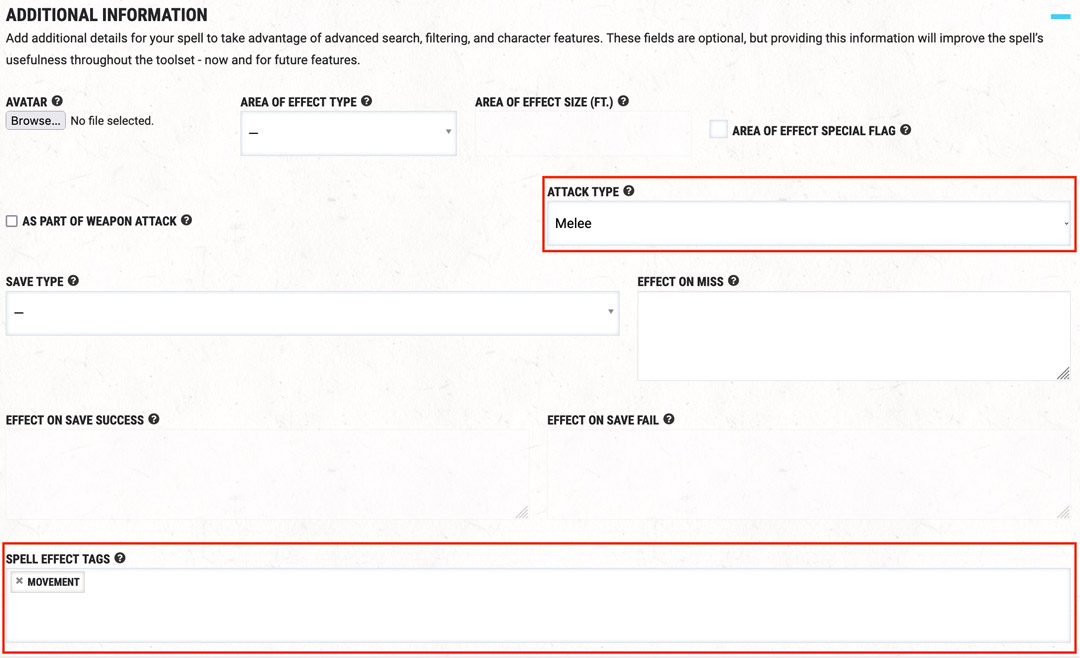
Now that you’ve created your spell, you’re ready to add additional information. None of this information is required, but it can be useful when you want to use the spell in digital character sheets and monster stat blocks. If you click anywhere in the “Additional Information” section, the fields will expand:

This section allows you to add some extra details about your spell, such as the area of effect type, area of effect size, attack type, save type if there is a saving throw, as well as an area to include the effects when a creature saves or fails the saving throw. For flame rush, we will only need to include “Melee” as the “Attack Type” and include “Movement” as the “Spell Effect Tag.”
Set modifiers, conditions, and effects at higher levels
With the “Additional Information” section covered, we can now move on to the “Modifiers,” “Conditions,” and “At Higher Levels” sections. There are a lot of options and mechanics in these fields. For flame rush, we’re going to add the following details:
Modifiers
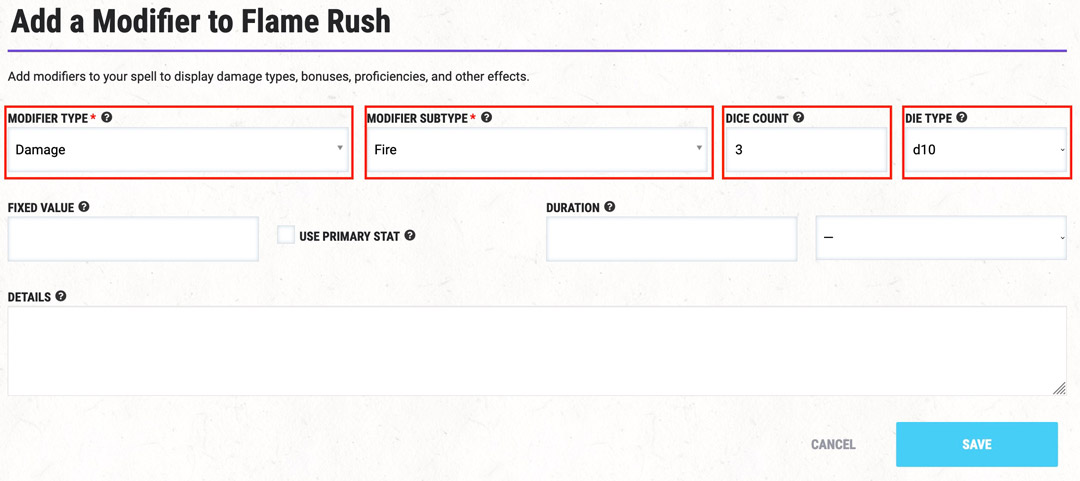
Adding modifiers is very important if you want your spell to be user-friendly within a character sheet or monster stat block. This section has a ton of options that can portray the effects of just about any spell effect. For flame rush, we’re going to set the following information in this section to specify the dice count, dice type, and damage type when players use this spell with digital dice:
- “Modifier Type:” Damage
- “Modifier Subtype:” Fire
- “Dice Count:” 3
- “Die Type:” d10
Conditions
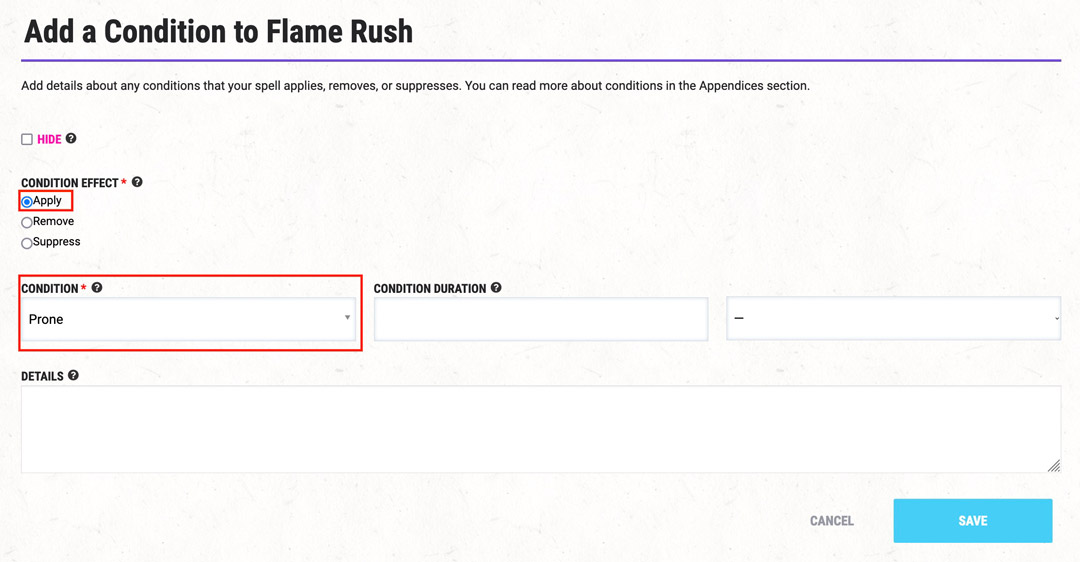
This section links a condition to your spell. You can decide whether your spell applies, removes, or suppresses a condition, along with the duration of this effect. For flame rush, we’re going to set the following:
- “Condition Effect:” Apply
- “Condition:” Prone
At Higher Levels
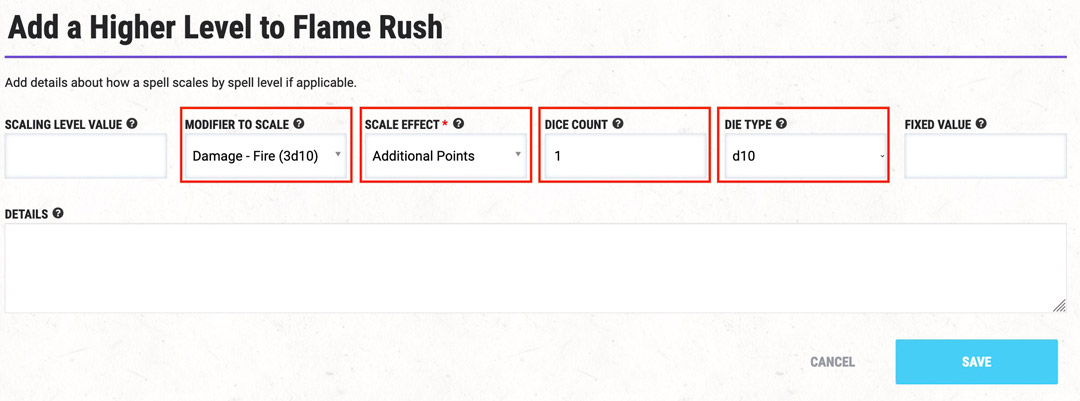
This section enables users to easily upcast your spell using their digital character sheet. For flame rush, we’re going to set the following:
- “Modifier to Scale:” Damage – Fire (3d10)
- “Scale Effect:” Additional Points
- “Dice Count:” 1
- “Die Type:” d10
Once we’re done here, we will hit “Save Changes.” Now, we’re good to go! We have successfully created our spell from scratch using the homebrew spell creator.
Now that our spells are ready to be used in our game, we’ll touch on how to edit, publish, and use the spells in your character sheet.
3. Adding a homebrew spell to your character sheet
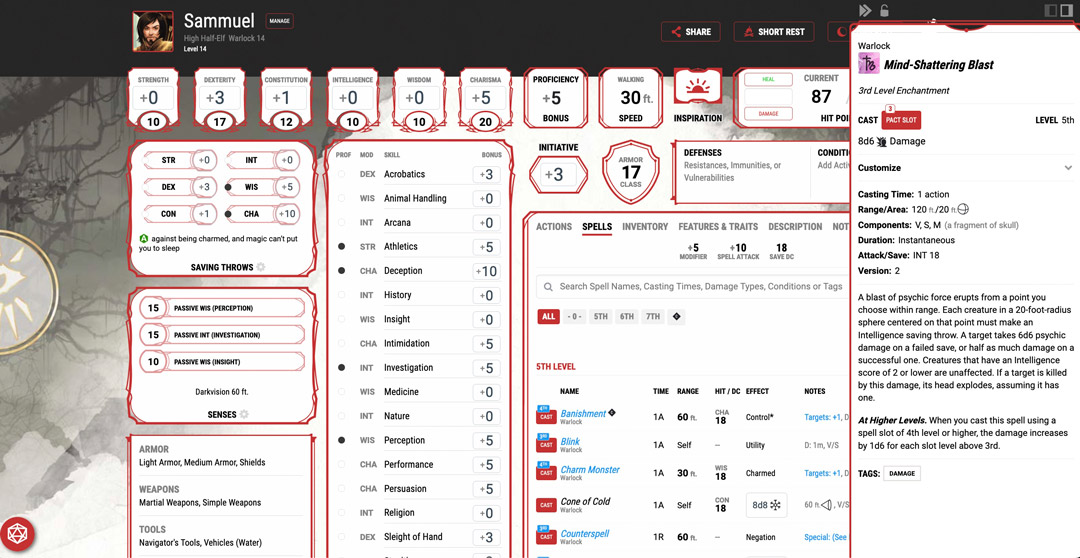
Once you’ve got your spell completed, it’s time to add it to your character sheet so you can use it in campaigns! To do this, hover over “Collections” in the top left of the screen and click on “My Characters.” From there, choose the character to which you’re looking to add the spell.
Head to the “Spells” tab, hit “Manage Spells,” and click “Add Spell.” Your spell should appear on the spells list. If it does not, click the hammer and anvil icon in the top right of your character sheet to go to your character builder. In the menu of the character builder, select the “Home” option and make sure “Homebrew Content” under “Sources” is toggled on.
Remember, your private homebrew in your homebrew collection is automatically shared with users in your campaigns. Therefore, you do not need to share it with the entire community for your campaigns to have access.
4. Editing your spell
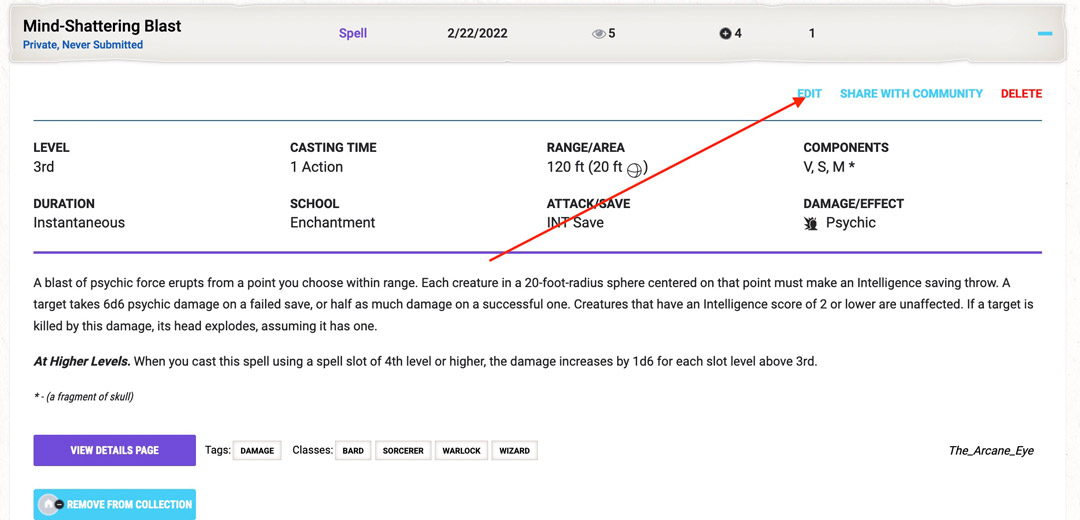
If you spot a typo or need to re-balance your spell, worry not! It’s easy to edit a spell, even if it’s already used in your game. Go to “Collections” in the top left of the screen, select “My Homebrew Creations,” expand the spell you want to edit, and hit “Edit.” Make sure to remove the spell from the spell list of any characters currently using the spell and refresh the page to make sure the spell’s changes are reflected.
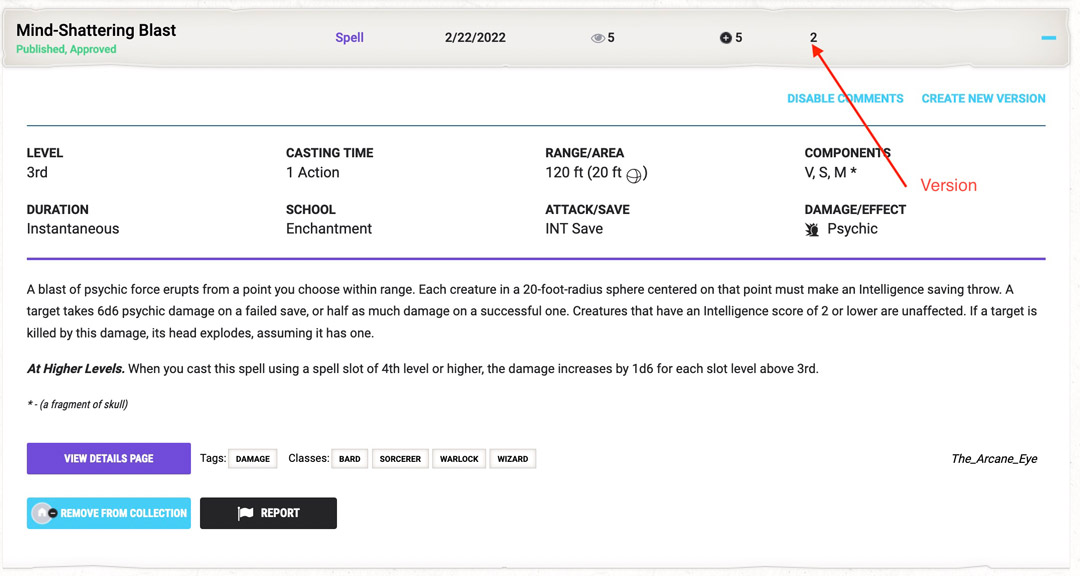
Editing a spell that has been published is still possible but takes a couple more steps. First, go to “Collections” in the top left of the screen, select “My Homebrew Creations,” expand the spell you want to edit, and hit “Create New Version.” Once the page reloads, find the new spell in your “My Homebrew Creations” list and hit “Edit.” Next, make your necessary changes and hit “Save Changes.”
Then, head back to your “My Homebrew Creations” page, find the updated spell, and hit “Share With Community.” The updated spell will replace the published version we cloned in the first step.
5. Publishing your spell
Assuming your creation follows the Homebrew Rules & Guidelines, you can publish it for the community to enjoy by clicking “Share With Community.” This is optional, however! There’s no need to select “Share With Community” if you just want the spell to be used in your campaigns.
If you plan to publish your spell to the D&D Beyond community, make sure you’ve done the following:
- Proofread your work, because once it’s published, it’s harder to edit
- Playtested it to ensure all of the modifiers work.
- Checked the homebrew against the Homebrew Rules & Guidelines to ensure it doesn’t violate any of the rules.
If you’ve done all that and you’re positive your homebrew is suitable to be published, click that “Submit” button. I’ve done just that with the spells I’ve made in this article, and you can find them here:
6. Time to cast some spells!
You’ve done the hard part, congrats! Now you get to reap the rewards of your creativity and use your spells in your games! D&D Beyond’s homebrew spell creator has unlimited possibilities to expand your spellcasters’ arsenals. As always, make sure to consult with your DM before adding homebrew to your game. Now, go sling some spells!
Mike Bernier (@arcane_eye) is the founder of Arcane Eye, a site focused on providing useful tips and tricks to all those involved in the world of D&D. Outside of writing for Arcane Eye, Mike spends most of his time playing games, hiking with his girlfriend, and tending the veritable jungle of houseplants that have invaded his house.
[ad_2]


